

The Silverback SB54iG is the best fit for most driveways where you want a tempered-glass backboard and can commit to a direct-bury post. Choose the Goalrilla GS54 if you want to be able to unbolt the hoop from its concrete anchor later. For a family that changes rim height often, the Lifetime 90962 combines a 54-inch polycarbonate board with a one-handed height adjustment. Before choosing any of them, make sure the spot works for both basketball and everyday parking. A well-placed 50-inch hoop can serve you better than a wider system that puts the rim too close to a wall, a car or the street. If your driveway or patio doubles as a games area, our indoor and outdoor table tennis table guide covers playing space and fold-away storage.
As an Amazon Associate, The Fitness Blog earns from qualifying purchases. The comparisons use current listings, manufacturer specifications and installation documentation.
Swipe to compare.
| Hoop | Backboard | Mount | Height adjustment |
|---|---|---|---|
| Silverback SB54iG | 54 in tempered glass | Direct-bury | 7.5 to 10 ft, crank |
| Goalrilla GS54 | 54 in tempered glass | Bolt-down anchor | Adjustable, check model manual |
| Lifetime 90962 | 54 in polycarbonate | In-ground pole | 7.5 to 10 ft, one-hand lever |
| Lifetime 90679 | 50 in polycarbonate | In-ground pole | 8 to 10 ft per exact listing |
| Silverback NXT 54 | 54 in polycarbonate | Direct-bury | 7.5 to 10 ft, crank |
The best in-ground basketball hoops for driveways
Silverback SB54iG B5400W | Best value for a glass backboard
The Silverback SB54iG pairs a 54-by-33-inch tempered-glass board with a four-inch square post. Silverback lists the glass at 3/16 inch thick, the rim adjustment range at 7.5 to 10 feet, and the overhang at two feet. It uses a crank, includes board padding, and has a breakaway rim. The post installs directly in concrete. Check the seller’s terms and Silverback’s warranty coverage for your location before ordering, especially coverage for the glass.
Pick this hoop if a glass rebound matters more to you than relocating the system. It fits the kind of driveway used for regular shooting practice and occasional family games. The two-foot overhang is a useful starting point for planning your layout. Verify the exact measurement points on the manufacturer’s drawing and leave additional room for a person moving under the board. You still need unobstructed space for a missed layup or a player chasing a rebound. If the post must sit tight to a retaining wall, consult the installation diagram before assuming the published overhang will solve the problem.

View Silverback SB54iG in-ground basketball hoop on Amazon
Goalrilla GS54 B4003W-1 | Best bolt-down option
The GS54 in the linked listing is model B4003W-1. It has a 54-inch tempered-glass board and an anchor kit. The GS54 owner’s manual shows the bolt-down assembly and parts layout for the B4003W series. Check the manual supplied with the delivered revision before digging. Goalrilla also makes the GS54C under a different model number. Compare their documentation separately if a seller offers both.
A bolt-down post is useful if you want to remove the upper system later or replace it with a manufacturer-approved fit. The buried concrete and hardware stay in place. If you move, confirm the cost and availability of a new anchor and the labor needed to disassemble, transport and reinstall the hoop. If you plan to reuse an existing anchor, confirm exact compatibility and have its condition assessed first. Similar bolt spacing doesn’t establish that the old footing is safe for another assembly.
Choose this system when the option to unbolt the post justifies the added cost or installation work. If you’re building a permanent court and don’t expect to move the hoop, compare the Silverback glass option above and put the difference toward the best available site or professional installation.

View Goalrilla GS54 B4003W-1 in-ground basketball hoop on Amazon
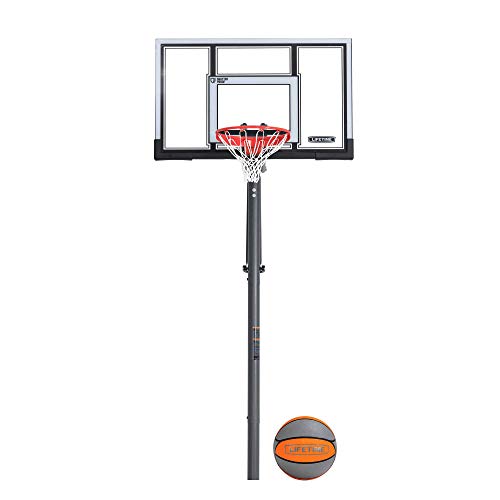
Lifetime 90962 | Best for frequent height changes
The Lifetime 90962 has a 54-inch steel-framed polycarbonate board and a round, three-piece steel pole. Lifetime specifies a continuous 7.5-to-10-foot adjustment via its Power Lift mechanism. A child practicing at one height and an adult shooting at another can use the same hoop without working through crank turns or fixed increments every time. Have an adult handle height changes according to the manual.
This option makes sense when convenience and board material matter more than reproducing the feel of a glass board. If most of your practice is shooting from the same spot at regulation height, you may value the rebound feel of glass more than quick adjustment. Compare the installed cost with the smaller Lifetime below. Moving up to this model mainly buys a wider board and a different lift mechanism, and those benefits matter most if you use them.
View Lifetime 90962 in-ground basketball hoop on Amazon
Lifetime 90679 | Best for a smaller budget and a 50-inch board
The 90679 is the 50-inch in-ground model in Lifetime’s lineup. The exact listing specifies a polycarbonate playing surface, a three-piece round pole and Quick Adjust II operation from 8 to 10 feet. Lifetime provides assembly instructions through BILT. Confirm the lowest setting on the exact manual if a younger player needs the hoop below eight feet. The similarly numbered 90678 is a portable model.
This is a good starting point for casual shooting when a 54-inch board would cost more than you want to spend. A narrower board gives you fewer places to bank a shot, but a clear playing area still lets you practice from both sides of the hoop. Ask how much you would use that extra width before choosing the 54-inch upgrade. If a smaller hoop still projects into the same parking path, find a different spot first. Width alone cannot fix a problem with the direction of the board or rim.

View Lifetime 90679 in-ground basketball hoop on Amazon
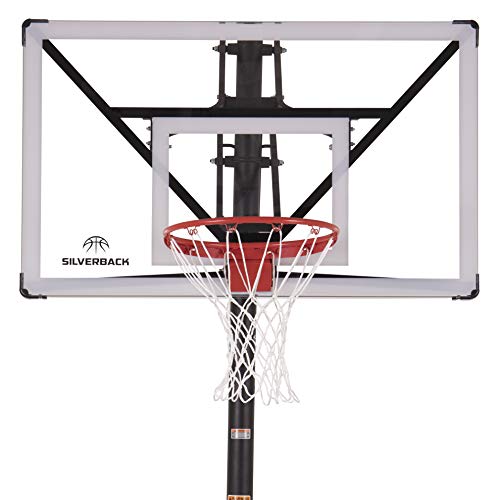
Silverback NXT 54 B8402W | Best 54-inch alternative to glass
The in-ground NXT 54 is a separate model from the SB54iG and from the portable NXT. Silverback’s product line documentation identifies its board as polycarbonate. Some listing copy describes it as glass. Shop by model number B8402W and confirm the construction against the manufacturer’s information before ordering if the seller’s text still differs. The model uses a direct-bury post and the manufacturer lists a two-foot overhang and a 7.5-to-10-foot rim range.
This pick works when you want the extra board width for layups and bank shots but don’t want a glass backboard. The folded edge is part of the board construction. The brand’s quick-assembly claim refers to assembling the equipment. Allow separate time for planning, excavation, concrete curing and final checks. If fast rim adjustment is the deciding feature, compare the Lifetime 90962’s lever operation with the NXT crank.
View Silverback NXT 54 B8402W in-ground basketball hoop on Amazon
Measure the driveway before choosing a hoop
Start with the rim location
Stand where you would actually shoot, then mark the desired rim line with tape or chalk. Walk toward it from the left and right as if going in for a layup. Check whether you could stop safely from both directions. Try the same route with a vehicle parked where it usually sits. A setup that only works when the whole driveway is empty may see less use than expected. A regular parking path also needs room for the backboard and rim above the car, including tall vehicles and racks.
Then work backward from that rim line. Use the exact model’s drawing to place the backboard and pole. Manufacturers don’t always measure overhang from the same points, and the board’s position can change as the rim moves. Check the lowest and highest intended settings. Walk around the proposed post with the installer and think through where someone would land or stop after running under the rim. Padding is worth considering, but it cannot make up for a pole placed in a normal landing zone.
Check what happens to a missed shot
Pick a safe site where players can get the ball without stepping into traffic. Shoot or toss a ball toward the proposed spot and watch what it does on the actual slope. Look at the edges of the usable court. A steep drop, a neighbor’s yard, a glass door or an awkward gate can make an otherwise convenient spot a poor choice. Moving the hoop to the side or pointing play away from the street may solve more than choosing a different post.
A ball-stop net may help when you have space to install it and the model supports the setup, but the net doesn’t replace safe boundaries. Leave space for the driveway apron, paths and doors, and check for restrictions on the net as well as the hoop. Consider how the area works in rain and at dusk. If the only way to retrieve misses is to run onto a street or across an active vehicle path, reconsider the location.
Separate playing grade from post level
The pole must be installed as the manufacturer specifies. A sloped playing surface is a separate problem. Standing at the curb end of a steep driveway can make a rim feel much higher than it does from near the house. A slope also changes how players stop and how a missed ball rolls. Check rim height against the playing surface beneath it, following the manual. If the surface is steep enough to make footing or runoff a problem, a professional site assessment can help determine whether the project is sensible.
If you can’t dig or don’t want a permanent commitment, start with the portable basketball hoop guide. Follow that system’s instructions for ballast and placement. A portable base has its own space requirements and should be placed on a suitable level surface. If only the rim and board fit and there is nowhere safe to put the base, a portable model won’t resolve the clearance problem either.
Choose a backboard and adjustment system
A 50- to 54-inch board is a good starting range for many homes because it offers usable bank-shot space without the width and weight of a regulation-size system. A wider board makes more sense if you have space to approach from both sides. If the main player tends to shoot from directly in front, put the extra budget toward stable installation and an adjustment range that fits the household.
Tempered glass appeals to players who value a firmer rebound feel, but it is heavier to handle and requires care in transport and installation. Polycarbonate is useful for a family that wants a less expensive residential setup. The board material alone doesn’t determine how the hoop responds. The board frame, mount, post and footing contribute to how much the system moves after a shot. If you are comparing similar hoops, look at the full assembly and read the warranty exclusions for the exact board before buying.
Think about who will adjust the rim. A crank suits a household that usually leaves the hoop at one height. A one-handed lever can be more convenient when switching between practice for different ages. Some systems move in steps. Others let you stop anywhere within the published range. Check whether you can reach the mechanism from level ground behind the post, and leave space to use it without leaning into landscaping or an active parking area. If you need a hoop below 7.5 feet, look for a product explicitly designed for that lower range.
Plan for delivery, concrete and installation
Check local rules, property boundaries and any association restrictions before ordering. Contact the local utility marking service before digging and account for any private services the public marking process doesn’t cover, such as irrigation or customer-owned lines. Give the installer the model number, the preferred playing direction and the manufacturer’s foundation drawing. An old slab or fence post footing does not tell you what the new hoop needs. Use the manufacturer’s concrete requirements, cure time and assembly sequence, with a qualified installer if the site or work is outside your experience.
Compare quotes on the same scope. Ask who handles excavation, spoil removal, concrete, anchor or pole placement, the later assembly visit and disposal of the cartons. If the model ships freight, find out where the carrier can leave it and who moves it from there to the assembly area. A large board should stay protected until the manual calls for unpacking it. Keep the packing labels and photograph damage before assembly so you have the model, condition and shipment details if a claim is necessary.
Read the manufacturer’s installation overview for the general sequence, then use the exact model’s manual to do the work. Anchor alignment and orientation affect where the board ends up. Before any concrete is poured, review the orientation of the anchor or pole and confirm the court side. Schedule the install around appropriate weather and leave the full cure time the manual requires. Arrange enough help or lifting equipment for the board assembly, and postpone that stage if the conditions make it unsafe.
Keep a record of what’s buried
Before the footing is covered, ask the installer for a few photos and a note identifying the anchor or sleeve. Save the exact manual, and ask where to look for a label once the hoop is assembled. If you sell the property or need replacement hardware later, those records help the next person identify the system without guessing from the size of the backboard. They also make it easier to tell a removable upper assembly from a post set directly in the ground.
After the hoop is installed
Check the rim’s height and level according to the manual and operate the adjuster through its allowed range. Check the fasteners, pad position and hardware against the parts list. Remove any packaging or temporary markers from the play area. A height decal can be helpful, but measure the rim if you need to practice at a specific height. Show adults who will use it how to set and secure the adjustment, and follow the manufacturer’s restrictions on use of the rim.
Keep the manual and order information with photos of the anchor, post and model label. After harsh weather, check the net, moving joints, fasteners, exposed steel and visible footing. Follow the maker’s instructions for inspection, cleaning and lubrication. If the system develops unusual movement, visible damage or a loose board, stop using it and have it inspected. Matching the model number when ordering a new rim or pad is easier than relying on board width.
Frequently asked questions
Can you install an in-ground hoop next to asphalt?
Yes, if there is a suitable place for the separate footing and the chosen system is installed according to its manual. A playing surface and a structural footing do different jobs. Ask the installer to evaluate the edge and what lies underneath it. Check that excavation won’t undermine the driveway or interfere with drainage or underground services.
Is a bolt-down hoop portable?
A bolt-down model can be separated from its anchor, with the labor and lifting equipment the job requires. The anchor remains in concrete. A hoop with a direct-bury post generally involves more work to remove. If you need to move the hoop routinely to free up parking, choose a suitable portable design and follow its positioning and ballast instructions.
Can you put a new hoop on an existing anchor?
Ask the manufacturer to confirm exact compatibility. Have the anchor and footing inspected if their condition or installation is uncertain. A similar base plate or nominal bolt pattern is only one part of the check. If you can’t identify the anchor or establish that it is sound, budget for a new installation.
Is a 54-inch backboard enough for a driveway?
Usually, provided the court has room for the board, the rim and an approach from both sides. A 54-inch board is wide enough for varied home shooting practice without requiring the space of a regulation-size board. Check that it fits at all intended heights and that players have space to land and stop before they encounter a pole, car or curb.
More home gym equipment on Amazon
This separate bestseller display covers general home gym equipment. The driveway hoop picks and model-specific links are above.

- 【Professional】More than 20 years of professional fitness equipment production experience, carefully...
- 【High Quality Thick Steel】The frame and weight guards of the whole set of equipment are made of thick...

- NEW UPGRADED DESIGN --- Enjoy efficient training right in the comfort of home with this equipment...
- ADJUSTABLE 138LBS WEIGHT STACK --- SunHome Home Gym System comes with a 138-pound selectorized weight...

- RitFit Home Gym Package gets you everything you need in just one click. It helps you to customize a...
- What's in the package - RitFit PPC03(PC-410CC) Power Cage with Cable Crossover System *1; RitFit...

- 【No Worry Service】Comes with detailed installation instructions, and provides step-by-step guidance...
- 【Expertly-Crafted Fitness】Experience a seamless fusion of cutting-edge technology and durable design...

- [Build Your Dream Home Gym]: One machine can meet your various needs. M4 is designed for trainers. It is...
- [Heavy Duty Quality & Detail]: Made of 50mm x 50mm commercial steel tube. The 12 connecting triangle...
This article was last updated on November 16, 2026 .


